Vegetarian

Rant: 5 Delicious and Satisfying Plant-Based Meals

A full leaf of Kale in the centre on a counter top surrounded by round slices of carrots and cucumer, half moon slices of radish, and lemon

What are some of the benefits of incorporating more plant-based meals into your diet?

Incorporating more plant-based meals into your diet can have numerous health benefits, including a lower risk of heart disease, and diabetes. Plant-based diets are also typically higher in fiber, which can help with digestion and satiety, and they can be more environmentally sustainable than meat-based diets.

I've been on a mission to incorporate more plant-forward meals into my diet and today, I'm going to share with you some ideas for delicious and satisfying plant-based meals that you can easily whip up on any weeknight. Whether you're a seasoned vegan or just looking to eat a little more plant-based, these meals check all the boxes.

First up, let's talk about stir-fry. This is one of my go-to meals for busy weeknights because it's quick, easy, and endlessly customizable. To make a plant-based stir-fry, start by sautéing some garlic, ginger, and vegetables of your choice in a wok or large skillet. I like to use a mix of bell peppers, onions, broccoli, and snap peas, but you can use whatever veggies you have on hand. Once the veggies are tender-crisp, add in some tofu or tempeh for protein, and your choice of sauce. I like to use a combination of soy sauce, hoisin sauce, and chili garlic sauce. Serve over rice or noodles, and you've got a delicious plant-based meal in under 30 minutes. If you do not like tofu and want to get a healthy portion of protein an alternative I use are edamame and maybe even sprinkle hemp seeds at the very end before mixing or serve over cooked quinoa.

What about tacos? I would imagine lots of pant-based options using tacos. What are some of the best plant-based taco toppings?

Who doesn't love tacos? And you are correct, the great thing about tacos is that they're easily adaptable to a plant-based diet. Some of the best plant-based taco toppings include avocado, salsa, diced tomatoes, shredded lettuce or cabbage, chopped cilantro (if you like that if not I substitute with parsley), and lime juice. Other options could be pickled onions, jalapeños, or vegan sour cream.

For plant-based tacos, start by sautéing some onion and garlic in a skillet. Then, add in some crumbled tofu or tempeh and your choice of taco seasoning. Cook until the tofu or tempeh is heated through and coated in the seasoning. Serve in tortillas with your favourite taco toppings, like avocado, salsa, cilantro, and lime.

Can salads be filling enough to be a main course? What are some ingredients that can make a salad more substantial?

Another great weeknight meal is a hearty salad. Don't think of salads as just a side dish - with the right ingredients, they can be a satisfying and filling main course. Start with a bed of greens, like spinach or kale, and add in some roasted vegetables, like sweet potatoes or beets. Then, add in some protein, like chickpeas or quinoa, and top with a flavuorful dressing, like a tahini lemon dressing or a balsamic vinaigrette. You'll be surprised at how filling and satisfying a big salad can be.

What are some of the best plant-based burger options on the market?

There are many great plant-based burger options on the market today, including Beyond Meat, Impossible Foods, and Morningstar Farms. Other options include Trader Joe's Plant-Based Burgers, Gardein Ultimate Beefless Burgers, and Dr. Praeger's Perfect Burger.

If you're looking for something a little more substantial, how about a plant-based burger? There are so many great options on the market these days, but you can also make your own at home. Try making a burger patty out of cooked quinoa, black beans, and spices. Then, top with your favorite burger toppings, like avocado, tomato, and lettuce. Serve with a side of roasted sweet potato fries, and you've got a satisfying and delicious plant-based meal.

How can you make a simple and flavourful plant-based pasta dish at home?

You can still enjoy pasta on a plant-based diet! Start by cooking your favorite pasta according to the package directions. Then, sauté some garlic, onion, and vegetables of your choice in a skillet. I like to use a mix of mushrooms, spinach, and sun-dried tomatoes. Once the veggies are cooked through, toss with the cooked pasta and a simple sauce made from olive oil, lemon juice, and red pepper flakes. Top with some fresh basil and vegan parmesan cheese, and you've got a delicious plant-based pasta dish that will have you going back to the pot for seconds.

So there you have it - five delicious and satisfying plant-based meals that are perfect for weeknight dinners. Whether you're a seasoned vegan or just looking to incorporate more plant-based meals into your diet, these meals are sure to please. By using a variety of colorful vegetables, healthy protein sources, and flavorful sauces and spices, you can create plant-based meals that are just as satisfying and delicious as their meat-based counterparts. So next time you're looking for a quick and easy weeknight meal, try out one of these plant-based options and enjoy all the health benefits that come with a more plant-forward diet.

Print Friendly and PDF

Recipe: Roasted Garlic And Butternut Squash Soup

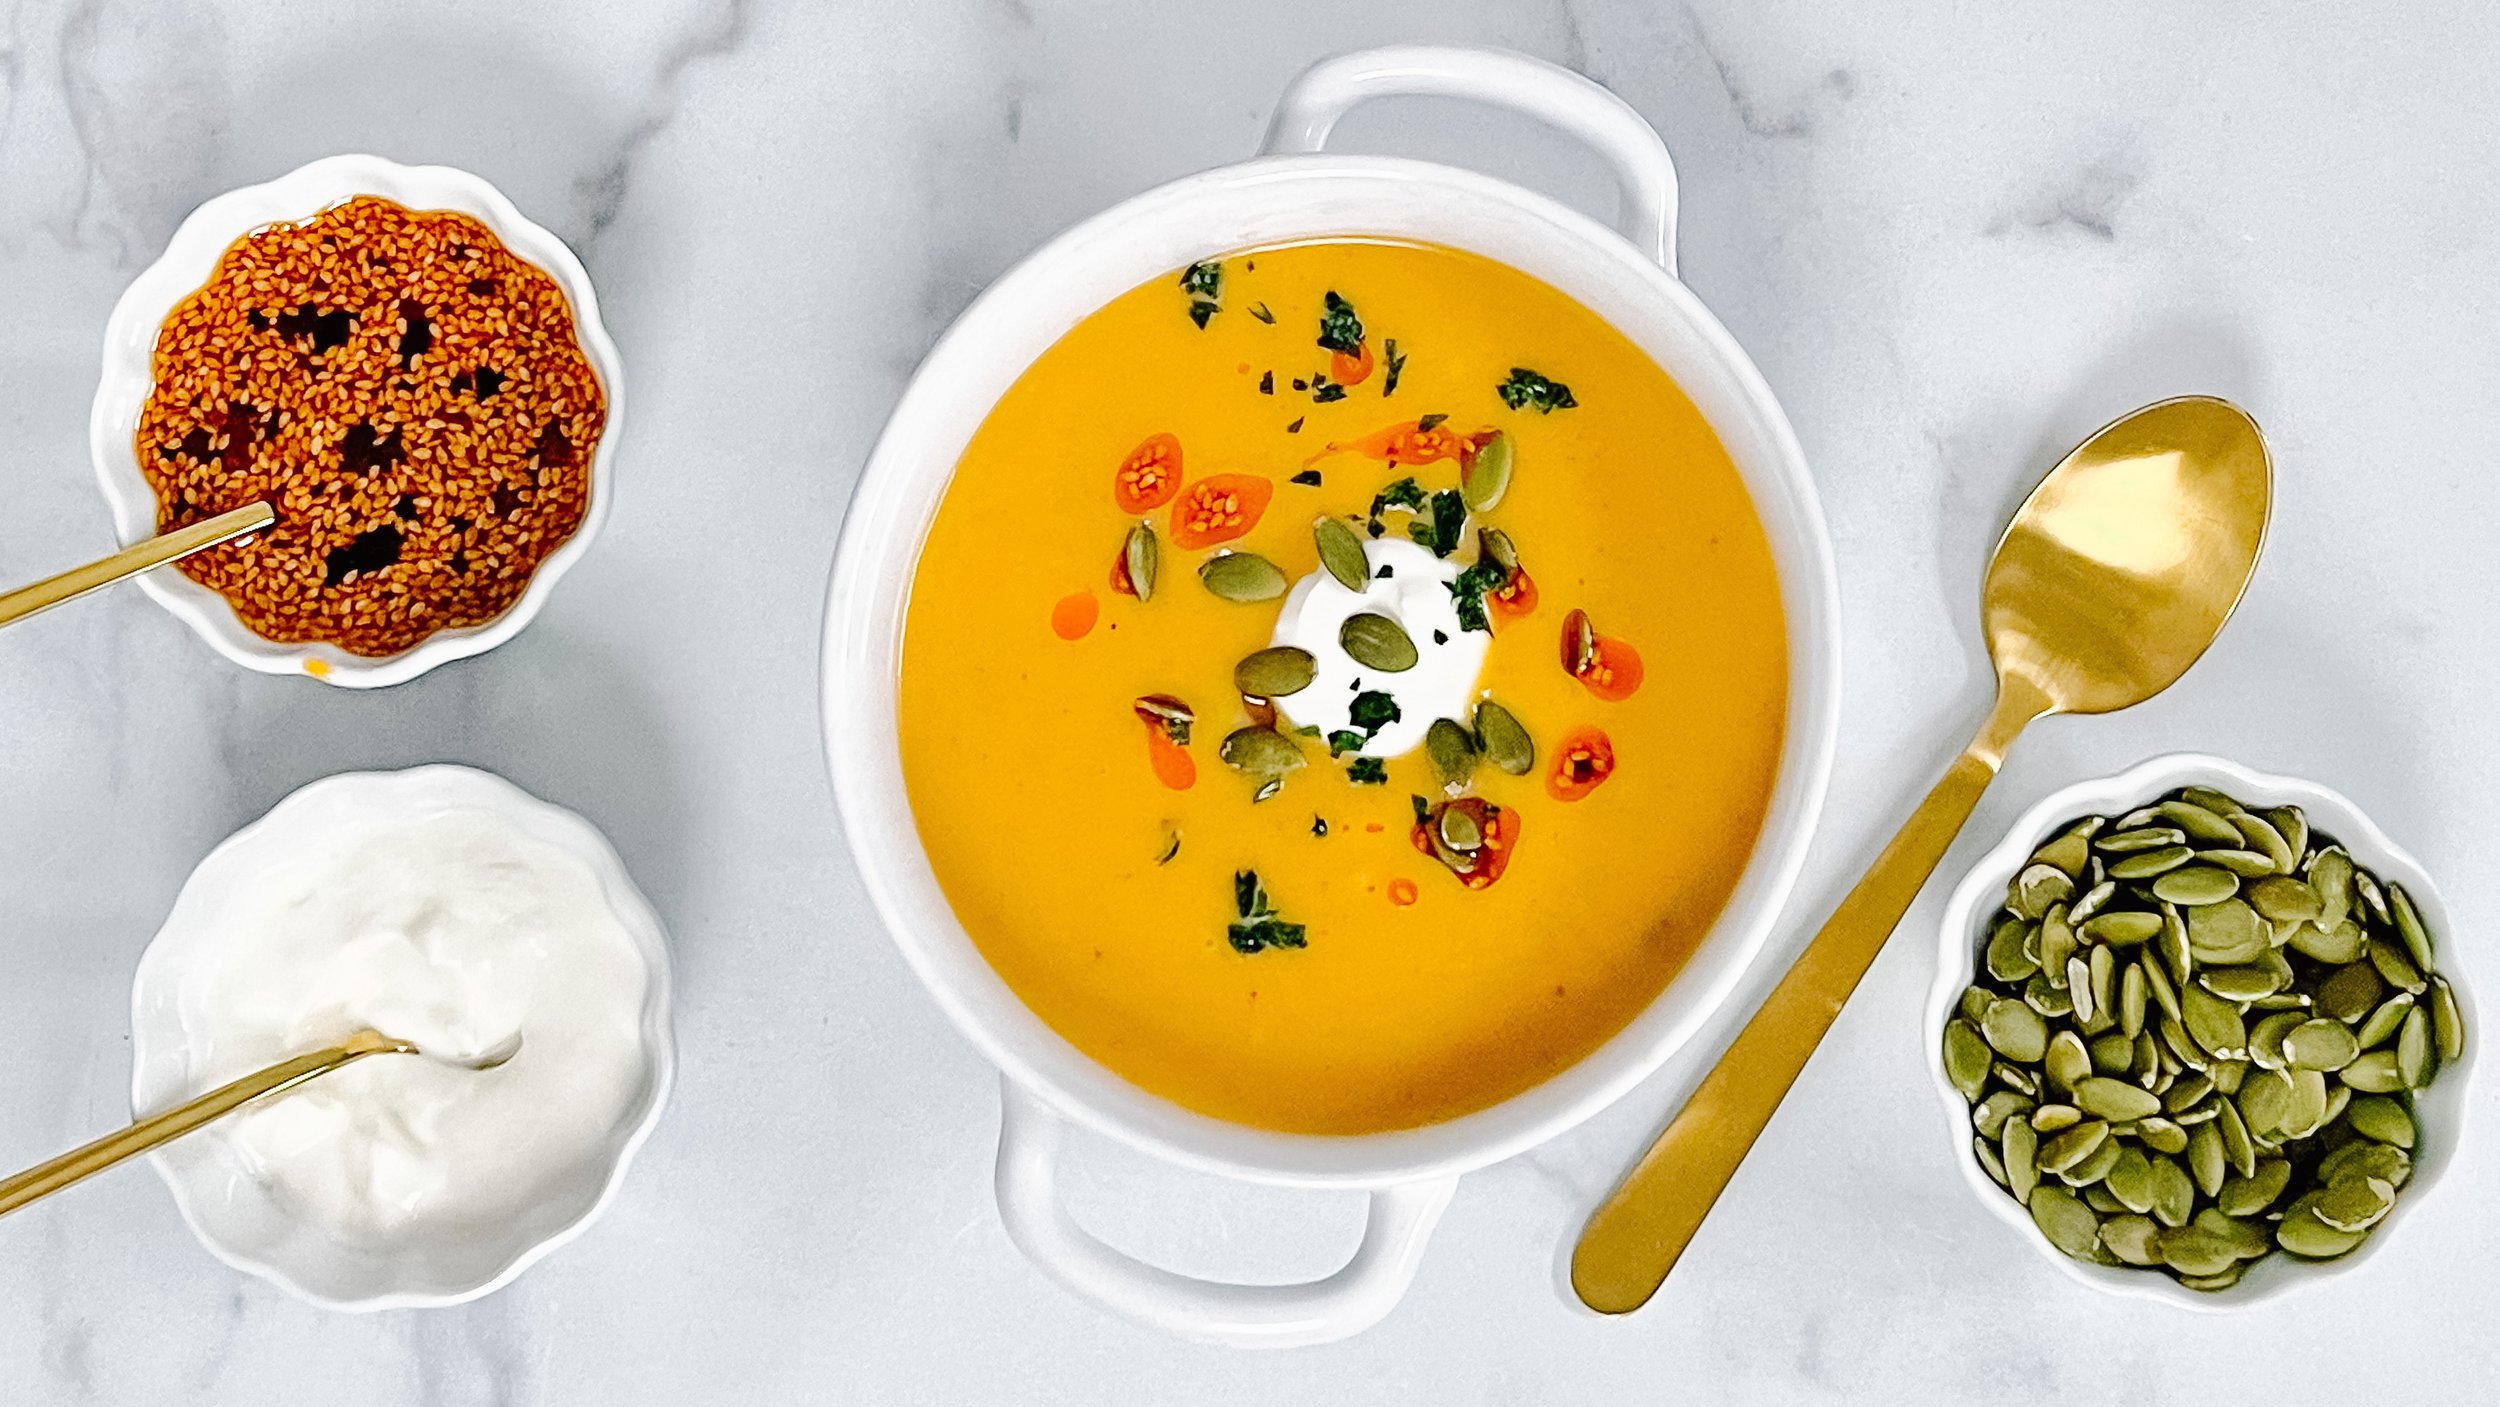
HOLY GOURD! It’s officially “Sweater Weather” here in Canada and that means welcome back soup season! This roasted garlic and butternut squash soup checks all the cozy autumn boxes for me. Drizzle a little chili oil over top and bring that warm comforting hug factor to the dish.

Now go on and make this show stopping soup. If you’re feeling like you need a little crunch, check out my crispy sour dough bread crouton recipe. Enjoy!

A bowl of soup in the centre topped with a drizzle of spicy chilli oil, a dollop of sour cream, a sprinkle of shelled pumpkin seeds and a few flakes of fresh parsley.Three smaller bowls around the soup with topping options and a gold spoon.

Roasted Garlic And Butternut Squash Soup

Prep Time: 10 minutes
Cook Time: 1 hour
Total Time: 1 hour 10 minutes
Serves: 6
Author: Mary Mammoliti / Kitchen Confession / kitchenconfession.com

INGREDIENTS

  • 1 large butternut squash halved, seeded and scored

  • 1 honey crisp apple, halved

  • 1 vidalia  onion, peeled and quartered

  • 2 heads garlic, tops cut off

  • 2 tablespoons extra virgin olive oil, plus extra to drizzle over garlic.

  • 3 sprigs thyme, stems remain ved

  • 1 tsp paprika

  • 1/2 teaspoon nutmeg

  • 1/2 teaspoon ground ginger

  • 3 tablespoons salted butter

  • 5 cups vegetable stock

  • 1/2 cup of heavy cream

INSTRUCTIONS

  1. Preheat oven to 400°F. Line a baking sheet with parchment paper.

  2. To a baking dish or rimmed sheet pan add the squash, onion, garlic to the baking sheet, cut sides facing up. Brush the cut sides of the vegetables with olive oil and season with paprika, salt, pepper and thyme.

  3. Cut the tops off your garlic bulbs and place them onto of a piece of aluminum foil (large enough to warp the garlic). Drizzle some olive oil over top, a pinch of salt and pepper then fold all corners together and twist to seal the package. Place the two garlic parcels onto the baking sheet.

  4. Turn the squash and apple cut-side down onto the sheet pan and roast for 30-40 minutes, until the squash is fully cooked. If the onion and garlic are roasted before the squash, remove them from the sheet pan and return the squash to the oven and allow it to cook for an additional 10 minutes if needed.

  5. Remove from oven and allow to the squash and roasted garlic to cool. Then scoop out the roasted squash, squeeze out the roasted garlic, remove the peel from the apple and add everything including the onion into the bowl of a food processor or powerful blender (I used my Vitamix). Blend until smooth.

  6. In a large stockpot, pour in the squash puree, add butter, ginger, nutmeg, and vegetable stock. Bring to a boil and simmer gently for 15-20 minutes. Remove from heat and whisk in the heavy cream.

  7. Garnish with a dollop of sour cream, a drizzle of spicy chilli oil, and a sprinkle of pumpkin seeds and serve immediately.

Print Friendly and PDF

Recipe: The Best Cheese and Broccoli Soup

In my opinion, Cheese and Broccoli Soup the ultimate comfort food! It’s deliciously cheesy, rich, creamy, and exactly what a warm bowl of comfort food should be. This soup is truly one of the best bowls of cheese and broccoli I’ve had in a long time! Made with minimal ingredients, it’s hearty, loaded with broccoli, brimming with fresh flavours and it’s easy to make. Bring on sweater weather, I’m ready!

Pin this recipe and get ready to make this warm and cozy soup all winter long. Soups really do make the colder months much more bearable - am I right?

For a step by step video on how to make this Tasty Cheese and Broccoli Soup visit my Instagram @kitchenconfession

The Best Cheese and Broccoli Soup

Prep Time: 15 minutes
Cook Time
: 45 minutes
Total Time: 60 minutes
Serves: 3-4 decent sized bowls

INGREDIENTS

  • 1 tablespoon + 4 tablespoons unsalted butter, divided

  • 1 medium onion, finely diced

  • 1 clove garlic, minced

  • 1/4 cup all-purpose flour

  • 2 cups low-sodium chicken stock

  • 2 cups half-and-half cream

  • 3-4 cups broccoli florets and stems, diced into bite-size pieces

  • 2 large carrots, peeled, and sliced into thin rounds, about 1/16th-inch

  • 1 teaspoon kosher salt

  • Freshly ground black pepper to taste

  • 1/2 teaspoon paprika

  • 1/2 teaspoon dry mustard powder

  • pinch cayenne pepper

  • 8 - 10 ounces (280g) grated aged cheddar cheese, reserve a bit to garnish bowls

INSTRUCTIONS

  1. In a large heavy-bottom pot, add 1 tablespoon butter, the diced onion, and sauté over medium heat until the onion is soft and translucent, about 4 minutes.

  2. Add the garlic and cook about 30 seconds. Using a spoon, scoop the onion and garlic mixture from the pot onto a plate and set aside.

  3. In the same pot add 4 tablespoons butter, flour, and cook over medium heat for about 3 to 5 minutes, whisking constantly, until flour is thickened. this is called a roux and it’s a very important step do not skip or soup will not reach the desired thickness.

  4. Continue whisking and slowly add the vegetable stock. and repeat this process for the half-and-half cream.

  5. Stop whisking, and allow the mixture to simmer (not boil) over low heat for about 15 to 20 minutes.

  6. While mixture is simmering, chop the broccoli and carrots. After simmering 15 to 20 minutes, add the broccoli, carrots, the onion and garlic to the pot, mix to incorporate.

  7. Add the salt, pepper, paprika, dry mustard powder, and cayenne (if you are using it). Stir to combine.

  8. Stirring intermittently, while simmering soup over low heat for about 20 minutes, or until it has reduced and thickened.

  9. While soup simmers, grate the aged cheddar cheese. Do not use pre-grated cheese in zip top bags because that cheese is resistant to melting and will change the texture and taste of the soup. After 20 minutes, add grated cheese, reserving a small amount for garnishing the bowls when serving. Give the soup a couple of stirs, the cheese will melt in and transfer soup to bowls, garnish with reserved cheese, and serve immediately.

RECIPE NOTES AND TIPS

  • Store soup in an airtight container for 5 to 7 days in the fridge.

  • Milk alternative, whole milk or 2% milk will work but soup won’t be as creamy.

  • I recommend using fresh broccoli, but if you are tight on time a bag of frozen broccoli florets will work.

  • Keep this soup vegetarian by using vegetable broth in place of the chicken broth and milk alternative in place of the cream.

TOOLS I USED IN THIS RECIPE

Whisk | Heavy Bottom Pot | Wooden Spoon | Soup Bowls | Ladle | Box Grater

Print Friendly and PDF

Recipe: Roasted Acorn Squash

Just when I thought I had finished cooking for the day this little beauty caught my eye and I just had to bake it up. Perfect addition to any meal and it’s the easiest recipe around.

FullSizeRender.jpg

ROASTED ACORN SQUASH

INGREDIENTS

  • 1 acorn squash, washed

  • 2 tbsp olive oil

  • 1 tsp garlic powder

  • Salt and pepper to taste

.

INSTRUCTIONS

  1. Preheat oven to 400°F * Cut the squash in half, using a spoon scrape out the insides, and slice into 1/2" half moons.

  2. Add the olive oil, garlic powder, salt and pepper. Toss to coat. * Lay the squash out on a baking sheet. Bake for 30 minutes until fork tender and golden in colour.


Print Friendly and PDF

Recipe: Spicy Roasted Pumpkin Seeds

A snacker [someone who eats lightly or between meals], a snack [a small amount of food eaten between meals] .

Raise your have if you’re a snacker! 🙋🏻‍♀️ OH I SEE YOU! Now repeat after me - .

“I like good snacks and I can not lie,

You other snackers can't deny,

That when the food goes in an itty bitty plate,

And goes right in your face

You get sprung..”

.

No reason, I just wanted someone to sing with me. Now sit back and relax with a bowl of SPICY ROASTED PUMPKIN SEEDS

FullSizeRender.jpg

Spicy Roasted Pumpkin Seeds

INGREDIENTS

  • 2 cups pumpkin seeds

  • 1 1/2 teaspoons olive oil

  • 1/2 teaspoon garlic powder

  • 1/2 teaspoon cayenne

  • 1/4 teaspoon sea salt

  • 1/4 teaspoon paprika

  • parchment paper

INSTRUCTIONS

  1. Bake at 300 degrees for 40 minutes, taking them out and stirring/flipping halfway through. Let cool for a minute and enjoy!

Print Friendly and PDF

Recipe: Creamy Cauliflower Soup

The temperature has dropped outside but the heat’s on high in the AMI Kitchen with this Creamy Cauliflower Soup! I KNOW! INSANE!⁣⁣ ⁣⁣ Have you tried Cauliflower Soup? What’s your favourite winter warm up dish? ⁣⁣ ⁣⁣


What's cookin' good lookin'? Mary Mammoliti, and she's got a must-taste dish with creamy cauliflower soup.

CREAMY CAULIFLOWER SOUP

PREP TIME: 10 minutes
COOK TIME: 25 minutes
TOTAL TIME: 35 minutes 
SERVES: 6-8 
AUTHOR:Mary Mammoliti | Kitchen Confession :

Photo Description: bowl of creamy cauliflower soup set on top of a white kitchen towel with a spoon to the left of the bowl. Soup is toped with sautéed cauliflower and roasted pine nuts

INGREDIENTS

  • 1 head of cauliflower

  • 2 tablespoons olive oil

  • 2 cups leeks, chopped 

  • 4 cloves garlic, minced

  • 3 cups vegetable stock

  • 2 sprigs fresh thyme

  • 3 cups 2% milk

  • 3/4 cup freshly-grated Parmegiano

  • Reggiano cheese

  • Kosher salt and freshly-cracked black

    pepper

  • Garnishes: sautéed cauliflower florets (**see recipe below), fresh thyme leaves, extra

  • Parmesan, chilli flakes, toasted pine nuts

INSTRUCTIONS

  1. Prep your cauliflower.  Remove and discard the outer leaves and trim off the stem.  Using a sharp knife quarter the cauliflower. Begin by cutting it down the middle of the stem, and cut each half in half, separating it into four pieces.

  2. Remove the core from the florets.  Roughly chop the florets, and then thinly slice the core.  Set aside.  (to garnish the soup with some sautéed cauliflower, set aside 1 cup of florets. 

  3. Heat olive oil in a large stockpot over medium-high heat.  Add the chopped leeks and sauté for 5 - 7 minutes, until soft and fragrant, stirring occasionally.  Stir in the garlic and continue to cook for an additional minute.

  4. Into the pot, add the chopped cauliflower, vegetable stock, and thyme, stir to combine. Continue cooking to a rolling boil. Reduce heat to medium-low, cover, and continue cooking for about 20-25 minutes, or until the cauliflower is fork tender.  

  5. Remove the thyme sprigs, and with your immersion blender blend until smooth.

  6. Stir in the milk, cheese, and season with salt and pepper.

  7. Pour into bowls, top with your desired garnish and enjoy!

**If you would like to garnish the soup with sautéed cauliflower, heat 1 tablespoon of butter and olive oil in a medium sauté pan over medium-high heat.  Add the cauliflower florets (they should be fairly small in size) and sauté for 3-4 minutes, or until the are tender and slightly golden on the outside. Season with salt and pepper. 

Print Friendly and PDF

Recipe: Warm Kale Brussels Sprouts and Fennel Salad

If Kale and Brussels Sprouts had a baby and then invited Fennel over for a visit then they all hung out on this cute white plate. I would call it your next best side dish - OH WAIT! That’s exactly what this is - let me introduce you to your new FAV dish. ⁣Warm Kale Brussels Sprouts and Fennel Salad⁣ ⁣

You’re Welcome :)

IMG_3633.jpeg

Warm Kale Brussels Sprouts and Fennel Salad

Prep Time: 10 minutes
Cook Time: 10 minutes
Total Time: 20 minutes
Serves: 6
Author: Mary Mammoliti | Kitchen Confession 

INGREDIENTS 

  • 2 shallots, peeled and thinly sliced

  • 3 tablespoons olive oil, divided 

  • 1 pound brussels sprouts, trimmed and sliced thinly

  • 1 bunch of kale leaves, removed from stems and thinly slice into ribbons 

  • 1 bulb fresh fennel, thinly sliced 

  • salt and pepper, to taste

  • 1 teaspoon red pepper chili flakes

  • Juice from half of a lemon

INSTRUCTIONS 

  1. Hold the Brussels sprout from the stem end and thinly slice discard the stem end.

  2. Heat 2 tablespoons of olive oil in a large nonstick pan over medium heat. Add the shallots and cook, stirring occasionally, until soft, 4 to 5 minutes.

  3. Add the Brussels sprouts, kale and remaining tablespoon of olive oil and sauté until tender, 3 to 4 minutes.

  4. Stir in the fennel and continue to cook for 2 minutes. Taste and season with salt, pepper,chili flakes, and the juice of 1/2 a lemon.

  5. Transfer to a serving dish and enjoy. 

Print Friendly and PDF

Recipe: One Pot Vegetable Tortellini Soup

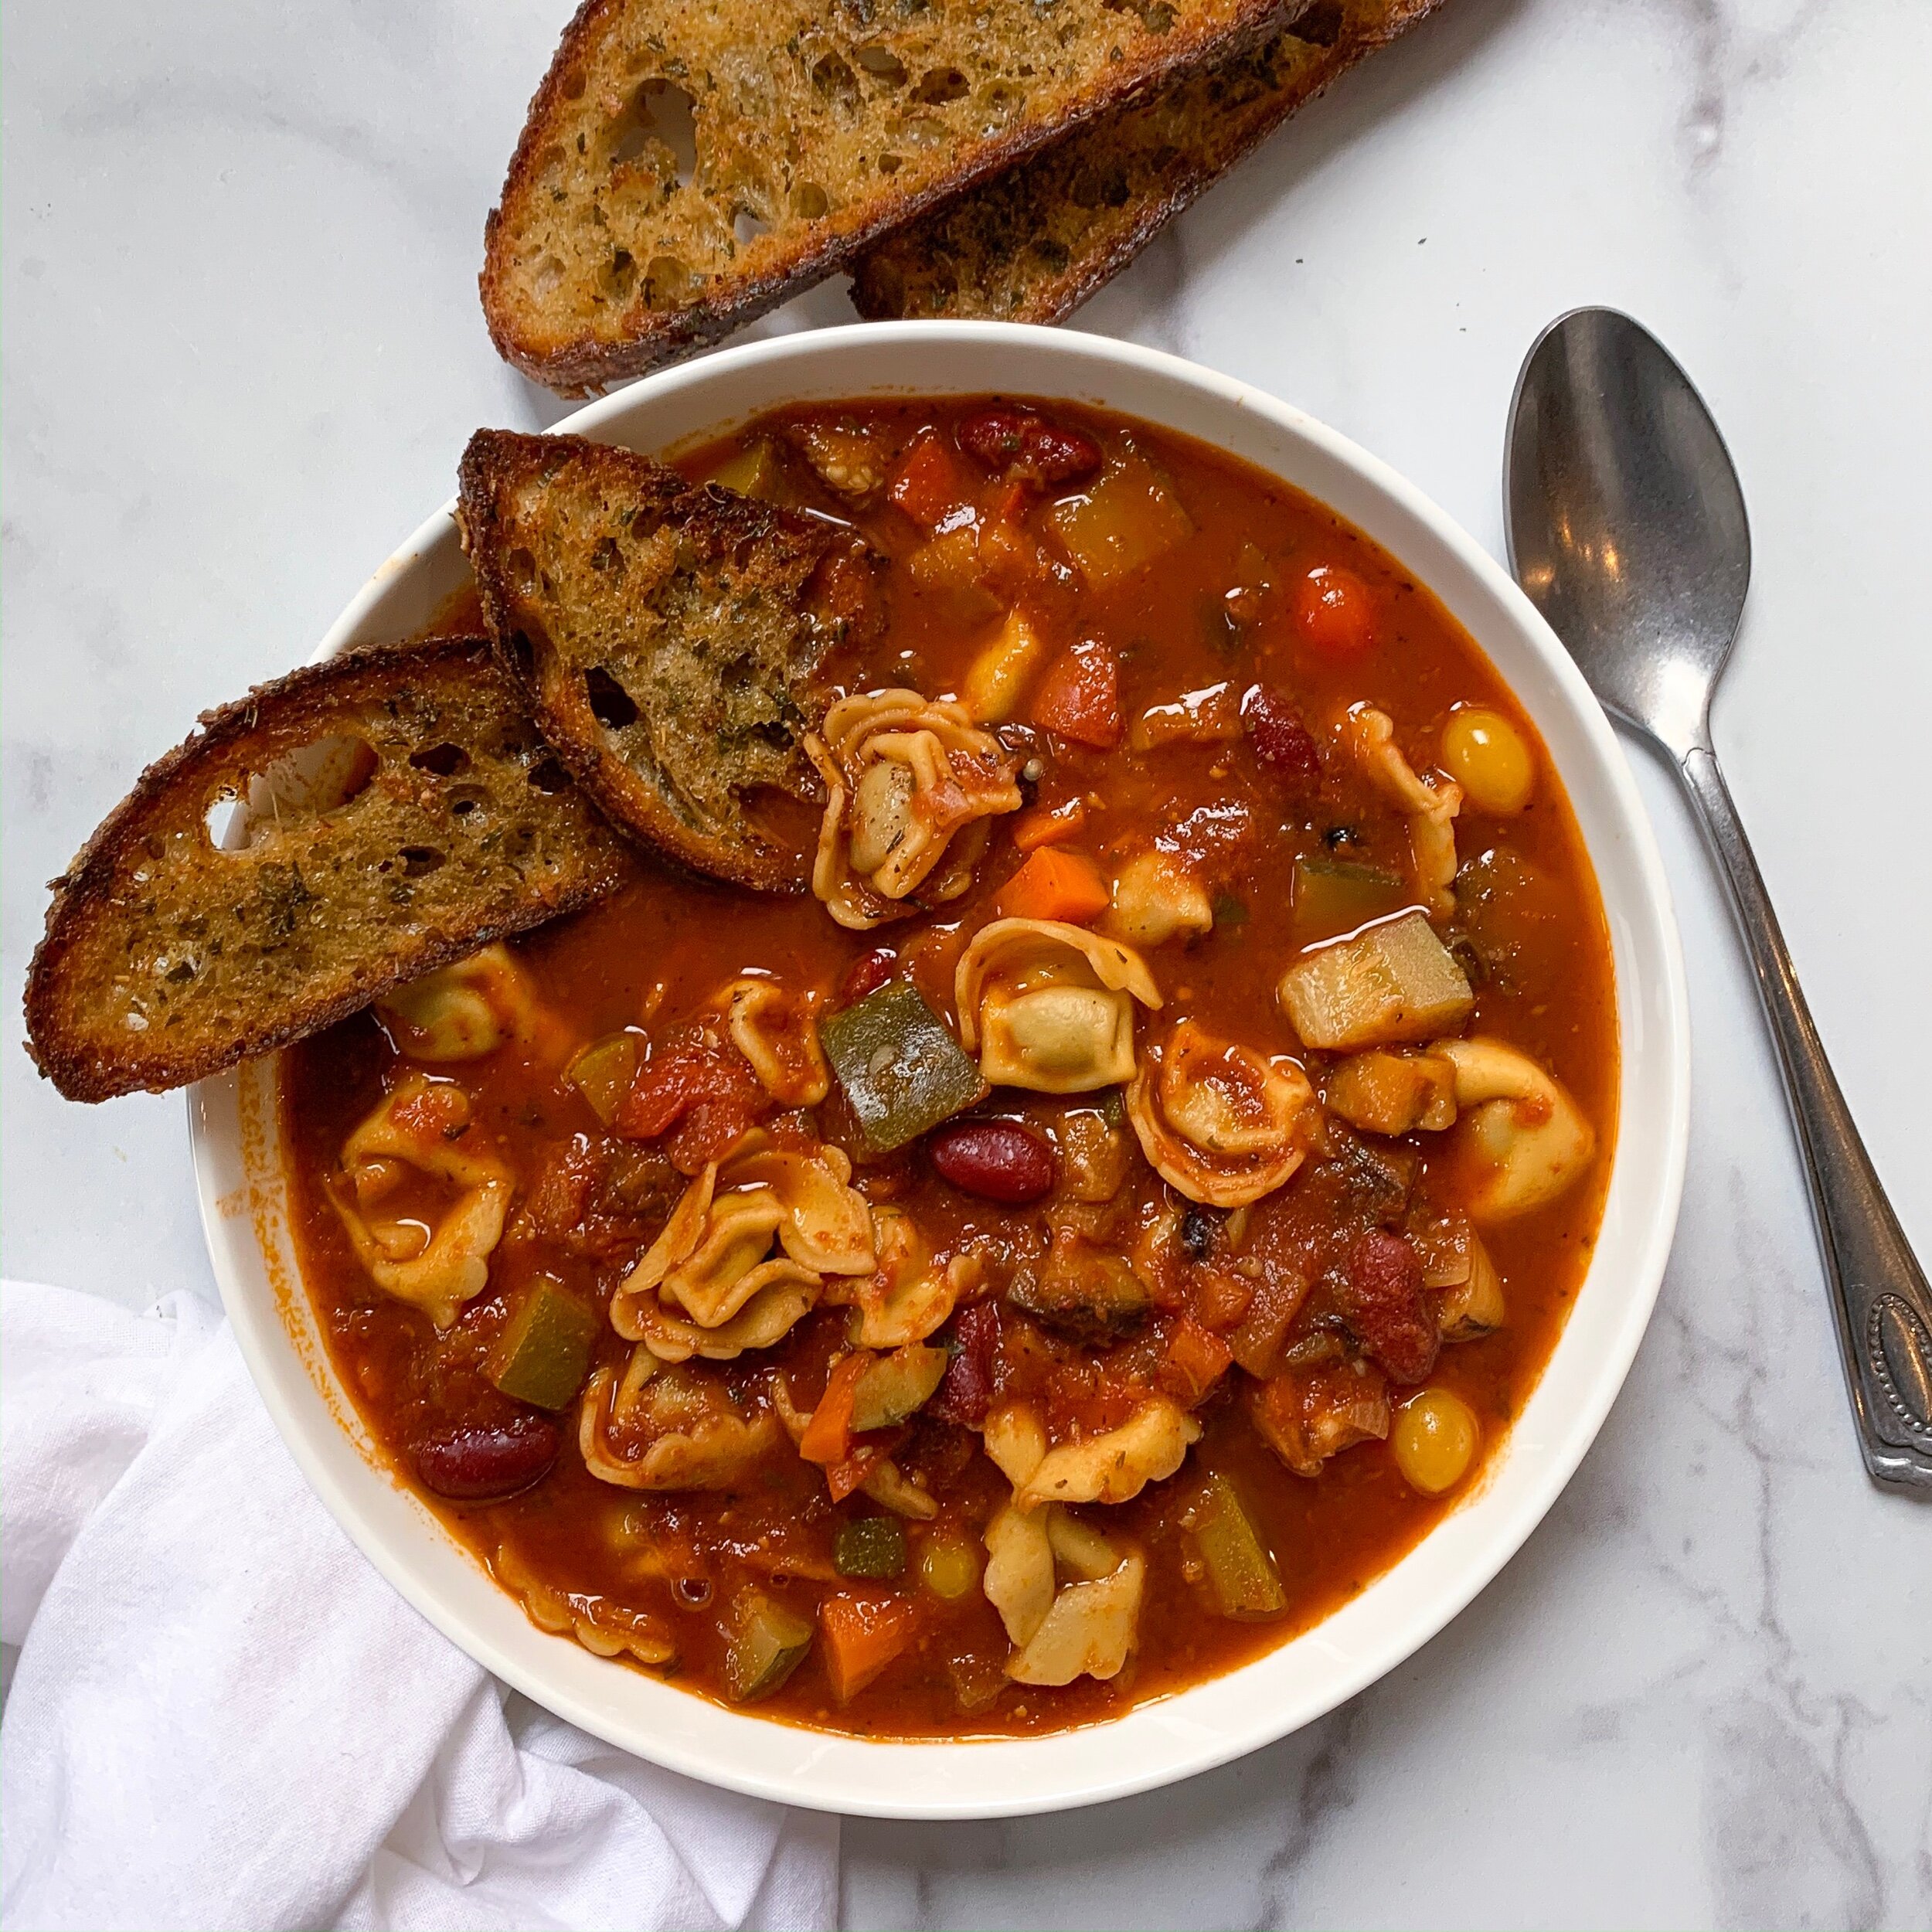
When the stars align and your first attempt at developing a recipe works out and you can’t stop high-five-ing yourself (this speaks volumes, I don’t do high-🖐🏼’s) you grab the largest bowl you can find, fill it up and don’t be shy. Toast some crusty garlic sourdough bread and call it a day. ⁣

⁣I wonder if I can balance this bowl on my chest and eat it on the couch wrapped in a blanket? I KNOW! Things that make you go ….. hmmm

In the photo: A warm bowl of One Pot Vegetable Tortellini Soup⁣

In the photo: A warm bowl of One Pot Vegetable Tortellini Soup⁣

One Pot Vegetable Tortellini Soup

Prep Time: 10 minutes
Cook Time: 40 minutes
Total Time: 50 minutes
Serves: 4
Author: Mary Mammoliti / Kitchen Confession

INGREDIENTS 

  • 1/4 cup olive oil

  • 1 large Italian eggplant, unpeeled and ½-inch-diced

  • 1 medium onion, finely diced

  • 1 red bell pepper, seeded and diced

  • 1 medium carrot, peeled and diced

  • 3/4 cup cherry tomatoes, halved  

  • 1-2 garlic cloves, minced

  • 1 tablespoon tomato paste

  • 1 can red kidney beans, drained and rinsed 

  • 1 can black beans, drained and rinsed 

  • 4 cups reduced-sodium beef stock (you can add an extra cup or two if needed)

  • 2 cups crushed tomatoes, no sugar added and San Marzano tomatoes if you can find it. 

  • 2 cups diced zucchini 

  • 1 teaspoon dried oregano 

  • 1 teaspoon dried parsley

  • 1/2 teaspoon dried thyme 

  • 1/2 teaspoon crushed red pepper flakes

  • 1 bag frozen beef tortellini (no need to thaw)

  • 1 teaspoon sea salt to taste 

  • 1 parmigiano reggiano rind, optional (see notes)

INSTRUCTIONS

  1. Heat olive oil in a large pot or Dutch oven, over medium heat. Add the eggplant and sauté for 5 minutes, stirring frequently, until tender. Add a little more olive oil if the eggplant is sticking.

  2. Into the pot add the onions, red bell pepper, carrots, and cook for 6 minutes, stirring occasionally

  3. Add the tomato paste, and cherry tomatoes, garlic and continue to cook for 3 minutes.

  4. Add broth, tomato sauce, zucchini, red and black beans, oregano, parsley, thyme, crushed red pepper flakes, salt, pepper and parmigiano reggiano rind. Cover, bring to a simmer, reduce heat to low or medium-low to maintain a steady simmer, and allow to simmer for 15 minutes.

  5. Add tortellini, Cover and increase heat as needed to regain a simmer, and continue cooking for 10 minutes more, or until tortellini are al dente. Remove from heat and enjoy. 

NOTES:

You can keep this vegetarian by swapping out the beef to cheese tortelini, and the beef stock to vegetable broth. If you don’t have the parmigiano reggiano rind you can omit and top your bowl of soup with grated parmesan before serving. 

Print Friendly and PDF

Recipe: Homemade Stock/Broth

Homemade Chicken Stock for the soul......and my belly.  I love making a giant pot of stock and add a little into almost every dish I make. Broth is one of those staples that you always want to have on hand in your kitchen. It adds flavor, color, and richness to your cooking. 

Here's a guide for when you can get away with stock, instead of water.

  1. Rice and Other Grains (Farro, Barley, Etc.) Use stock to cook your grains.

  2. Ragu and Pan Sauces. Add a cup to a pot of tomato sauce or to deglaze pan sauces.  After sautéing chicken breasts in a skillet, deglaze with a splash of broth or stock to loosen the bits on the bottom of the pan. Adding stock gives your sauce a rich deep flavour.

  3. Braising pot roast or short ribs in beef stock will make them more flavorful.

  4. Soups and Chili 

IMG_3928.jpeg

Homemade Stock/Broth

Prep Time: 15 minutes 
Cook Time: 1 Hour 
Total Time: 1 hour 15 minutes 
Author: Mary Mammoliti | Kitchen Confession 

Ingredients

  • 2 tablespoons olive oil

  • 1 large red onion, diced

  • 2 medium carrots, peeled and sliced into 1/2 inch rounds 

  • 2 stalks celery, chopped into 1/2 inch pieces

  • 3 cloves garlic, chopped

  • 2 cups clean vegetable scraps - optional (I used 1 leek and 1 cup mushroom stems)

  • 2 cups cherry tomatoes

  • 1 tablespoon tomato paste

  • 1 bay leaf

  • 1/2 cup fresh parsley, chopped

  • 1 sprig fresh thyme (or 1/2 teaspoon dried thyme)

  • Kosher salt to taste

  • Fresh cracked pepper to taste

  • Add the bones of a rotisserie chicken for chicken stock

  • 11 - 13 cups cold water

Instructions

  1. In a large stock pot, sauté onion, carrots, and celery in olive oil over medium/low heat and stirring often for 3-5 minutes or until onions are translucent. Add additional olive oil as needed If your vegetables begin to stick to the pan.

  2. Add garlic, cherry tomatoes, tomato past, vegetable scraps if adding them and sauté for 1 additional minute.

  3. Add remaining ingredients, top with cold water and slowly bring to just under the boiling point. Adjust heat accordingly. You do not want to boil the stock, slowly heat the mixture to ensure optimal flavour extraction from the vegetables and simmer for one hour.

  4. Add salt and pepper to taste.

  5. Remove from heat, cool slightly and strain through a fine mesh strainer, cheesecloth or nut bag. Pour into a mason jar, seal the jar and refrigerate 3 to 4 days or you can freeze it and it will last for several months.

Notes

Add a chopped parsnip, mushrooms or a leek if desired.

Print Friendly and PDF

Recipe: Creamy Broccoli Cheese Soup

Soup season has arrived and I’m here for all of the delicious bowls of heart warming meals. Every time I hear someone say Broccoli I think of Dana Carvey’s SNL Choppin' Broccoli song. If you haven’t heard it or have no idea what I’m talking about Google it. I promise you won’t be disappointed.

So, naturally I was singing it while making this Cheese and Broccoli Soup! Hey Dana, can you add Soup to the song? It could go something like this “she’s Choppin' Broccoli - AND MAKING SOUP”

Well I’m sure that won’t happen but I can tell you this did happen. Probably one of the creamiest Cheese and Broccoli Soups I’ve ever made and I’m sharing it with you today. Enjoy my friends!

PHOTO DESCRIPTION: A rich yellow soup with shredded cheddar cheese as a garnish on a white plate with a silver spoon laying beside the plate over a white and tan linen place mat.

PHOTO DESCRIPTION: A rich yellow soup with shredded cheddar cheese as a garnish on a white plate with a silver spoon laying beside the plate over a white and tan linen place mat.

Creamy Broccoli Cheese Soup

Prep time: 10 minutes
Cook time: 45 minutes
Total time: 55 minutes
AUTHOR: Mary Mammoliti / Kitchen Confession

INGREDIENTS

1 tablespoon + 4 tablespoons unsalted butter, divided
1 medium sweet yellow onion, diced
1 clove garlic, minced
1/4 cup all-purpose flour
2 cups low-sodium vegetable or chicken stock
2 cups fat-free half-and-half (regular half-and-half may be substituted; whole milk or 2% milk will work but soup won’t be as creamy)
3 cups broccoli florets, diced into bite-size pieces + 1 cups stems
2 large carrots, peeled, and sliced into very thin rounds
3/4 teaspoon salt, or to taste
3/4 teaspoon freshly ground black pepper
1/2 teaspoon smoked paprika
1/2 teaspoon dry mustard powder
pinch cayenne pepper, optional
8 ounces grated sharp cheddar cheese, with a small amount reserved for garnishing bowls

NOTE: Do not use pre-grated cheese in ziptop bags because that cheese is resistant to melting and won’t incorporate well. ⁣

DIRECTIONS

  1. In a small saucepan, add 1 tablespoon butter, the diced onion, and sauté over medium heat until the onion is soft and translucent, about 3 minutes.

  2. Stir in the garlic and cook until fragrant, about 30 seconds. Remove from heat and set the pan aside.

  3. In a large stock pot over medium heat add 4 tablespoons butter, flour, and whisk continuously for 3 minutes, or until the mixture has thickened. This is your roux.

  4. Slowly whisk the vegetable stock into the roux (flour mixture), add the cream to your pot and whisk to combine.

  5. Allow mixture to simmer over low heat for 15 minutes, or until it has reduced and thickened. TIP: Whisk intermittently to keep a creamy constancy.

  6. While the mixture is simmering, chop the broccoli and carrots and add the to the soup at the end of your simmering time of 15 minutes and add the onion and garlic you previously set aside to the pot.

  7. Add the salt, pepper, paprika, dry mustard powder, and cayenne and stir to combine, and continue to simmer over low heat for 20 to 25 minutes. Stirring occasionally to avoid burning the soup.

  8. While your soup simmers, grate the cheese and add most of the cheese at the very end of your cooking time, reserving a small amount for garnishing bowls. Stir the cheese into the soup until melted and incorporated.

  9. Transfer soup to bowls, garnish with reserved cheese, and enjoy.

    NOTE: Soup will keep refrigerated in an airtight container for 5 to 7 days.

Print Friendly and PDF

Recipe: Lemony Fresh Orzo Salad

To quote my nieces and nephew “FOMO is real” and I couldn’t agree more. It’s been so grey and rainy here in Toronto that I’m missing the sunshine. Where is it?  I bet it’s at a party! Did I miss the invite? Why hasn’t it been around? GHAAAA! I can’t take this! Let me check @instagram. I’m missing out on something great! Maybe. Umm, probably not. Who knows where it is and what it’s doing I just miss it and decided to stop obsessing. I’m taking matters into my own hands.  Did you know that adding lemon to just about any dish will give you instant sunshine? 

Give this beauty a try and let me know if it brightens up your day.

IMG_7930.jpeg

Lemony Fresh Orzo Salad

TOTAL TIME: 30 MINS
PREP TIME: 15 MINS
COOK TIME: 15 MINS
AUTHOR: Mary Mammoliti / Kitchen Confession

INGREDIENTS:

  • 12 ounces uncooked orzo

  • 2 large handfuls fresh arugula, chopped

  • 1 (15-ounce) can chickpeas (garbanzo beans), rinsed and drained

  • 1 English cucumber, diced

  • 1 cup frozen corn, thawed

  • 1 cup roughly-chopped fresh basil leaves

  • 1/2 head radicchio, roughly-chopped fresh

Lemony Dressing:

  • 2 lemons, juiced

  • 1 tablespoon rice wine or white vinegar

  • 1/2 tablespoon Dijon mustard

  • 1 garlic clove, finely minced

  • 1/2 cup olive oil

  • 1 teaspoon sea salt and freshly-cracked black pepper, to taste

  • optional: 1/2 cup crumbled feta or goat cheese

DIRECTIONS:

  1. Cook the pasta in a large stockpot of generously-salted water until al dente, according to package instructions.  Drain pasta then rinse thoroughly in a strainer with cold water until the pasta is chilled.  Transfer to a large mixing bowl.

  2. Add all the lemony dressing ingredients to a medium sized bowl and whisk for 1-2 minutes, or until the dressing begins to look creamy. Set aside.

  3. Add the remaining ingredients to the mixing bowl. , pour dressing over and toss to combine.  Taste, and season with extra salt and pepper, if needed.

  4. Serve immediately.  Or cover and refrigerate for up to 3 days.

NOTE:

If you do not use all the dressing store in a sealed jar in your fridge for up to one week.

Print Friendly and PDF

Recipe: Creamy Cauliflower Garlic Mash

Comment below if you love mashed potatoes!

What if I told you this wasn’t mashed potatoes. What if I said this warm plate of creamy garlic mash was actually made of cauliflower. Would you try it? Before you rethink your decision, give this recipe a try. Have a heaping spoon with some braised short ribs, or add it as a side with your Thanksgiving feast and lighten things up.

WARNING: Following the consumption of this Cauliflower Garlic Mash there may be sudden outbursts of joy, excessive smiling, and out of control requests for more.

Photo Description: Creamy Cauliflower Garlic Mash in a square serving dish on top of a white fringe cloth and 2 sunflowers in the bottom left corner.

Photo Description: Creamy Cauliflower Garlic Mash in a square serving dish on top of a white fringe cloth and 2 sunflowers in the bottom left corner.

Creamy Cauliflower Garlic Mash

 PREP TIME: 15 minutes
Cook TIME:
15 minutes
TOTAL TIME:
30 minutes
SERVES: 4
AUTHOR:
Mary Mammoliti / Kitchen Confession

INGREDIENTS

1 large head of cauliflower, cut into florets
4 cups chicken broth
4 cups water (more if needed to cover florets)
1 tablespoon unsalted butter
3 tablespoons extra virgin olive oil
2 large garlic cloves, minced
¼ cup 2% milk
salt and black pepper to taste

DIRECTIONS

  1. Place the cauliflower florets in to a large stock pot and cover with the chicken broth and water. Cook for 8-12 minutes or until fork tender. Drain and keep the in the colander and move onto next steps. You want to get as much water as possible out of the cauliflower.

  2. Pour the olive oil into the stock pot and sauté the garlic until fragrant. Remove from heat and return the cooked cauliflower back into the stock pot, add milk and butter. Using an emersion blender purée until smooth and creamy. Taste for salt and pepper.

  3. Garnish with chopped parsley, drizzle extra virgin olive oil over top and serve warm.

NOTES

Refrain from adding additional butter and/or milk to the mash, it will thin out too much.

Print Friendly and PDF

Recipe: Watermelon Berry Salad

Yesterday, I ran an Instagram poll (one of many I like to do on instagram) and the poll results are in! I posted a photo of this Watermelon Berry Salad and asked “would you like the recipe for this summer salad?” and the “Hells Ya!” have won.

Thank You all for taking part and keep scrolling down for the full recipe. These polls help me decide what recipes to post. and which I should keep to myself, locked away, deep in my archives. I hope you enjoy this salad as much as Frank and I do.

PSA: The dressing is what makes this combination shine BUT if it’s not your thing simply pour the juice of two limes over the cut fruit and toss.

If you've been following along for a while or just joined the KC foodie gang, nothing makes me happier than food. From cooking, to eating to talking about food. So, feel free to comment below. I would love to hear your thoughts. Don’t be shy, let’s chat ~ (((hugs)))

IMG_8823.JPG

Watermelon Berry Salad

Total Time: 10 minutes
Serves: 4 servings
Author: Mary Mammoliti | Kitchen Confession

INGREDIENTS

For the Salad

1/2 seedless watermelon cubed (approx. 8 cups)
1/2 cup blueberries
1/2 cup blackberries
1/4 cup crumbled feta (I used goat/sheep milk feta)
8+ mint leaves, chiffonade (cut mint leaves into slender ribbons)

For the Dressing

1 lime, juiced
2 teaspoons olive oil
2 teaspoons honey
1/4 teaspoon sea salt

INSTRUCTIONS

  1. Combine the fruit, mint and cheese in a bowl.

  2. Add the dressing ingredients to a bowl and mix well to combine. Pour over salad, toss and serve .


Print Friendly and PDF

Recipe: Kung Pao Chickpeas and Quinoa Lunch Bowl

Recipe: Kung Pao Chickpeas and Quinoa Lunch Bowl

I love a good fridge clean out. It always produces some of my favourite meals. Opening the refrigerator door, scanning shelves and drawers for ingredients that will make up your meal.

Print Friendly and PDF